I finally have a chance to take a breath at work. Not saying there isn't still tons to do, but I am getting help on the major project. Also, they are giving us the week after New Years to work on it. So I am not as frantic. Hooray!
So I am catching up on pics of FOs and WIPs. Whee.
I will probably do these a couple at a time from oldest to newest so I post these as I get a chance today. I am hoping to get all caught up today. But that may not happen as I have work that needs to get done. So here goes!
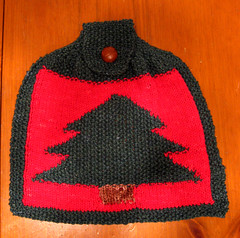
Christmas Tree Dish Towel

Cast On:
November 25 2008
Completed:
November 29 2008
Made for:
Big George
Needles:
US 7 / 4.5 mm
Yarn:
Lily Elite Cotton
Purchased at Smiley's Yarns sale in NJ
Size:
Prewash - 12" x 12" (including flap)
The tree chart was created with KnitPro by microrevolt.org:
http://www.microrevolt.org/knitPro/
I was going to use the towel top from the Christmas Lace Kitchen Hanging Hand Towel.
http://wishingiwasknitting.blogspot.com/2008/04/christmas-lace-kitchen-hanging-hand.html
However, I tried that top and ripped it out. That top cuts in very sharply which was obscured the pattern on the towel. Because of the way it pulls in, it was making the top of the tree disappear in the folds.
So I improvised the decreases on the top to not obscure with the design on the towel portion. It is some basic decreases taking into account the seed stitch pattern I had been using. I think it worked out fairly well.
I am planning on posting the finished pattern on my blog when I get the time.
Basic pattern:
Cast on 58 sts.
4 rows of seed stitch in green
At each edge, do 4 sts in seed stitch.
RS Row:
K1, P1 2x
WS Row:
P1, K1 2x
For the center of the towel, follow the chart.
Note:
If you want less bobbins floating around, you can either eliminate the seed stitch edge or do it in the background color.
6 rows of seed stitch in green
Now, start decrease for the top of the towel.
RS Row:
K1, P1, SSK twice *K1, P1* repeat to last 8 stitches, K2tog, P1, K1 K2tog, K1, P1 (54 stitches)
All WS Rows:
P1, K1 across
Next RS Row:
K1, P1, SSK four times *K1, P1* repeat to last 16 stitches, K2tog, P1, K1 K2tog three times, K1, P1 (46 stitches)
Next RS Row:
K1, P1, SSK four times *K1, P1* repeat to last 16 stitches, K2tog, P1, K1 K2tog three times, K1, P1 (38 stitches)
Next RS Row:
K1, P1, SSK three times *K1, P1* repeat to last 12 stitches, K2tog, P1, K1 K2tog two times, K1, P1 (24 stitches)
Next RS Row:
K1, P1, SSK three times *K1, P1* repeat to last 12 stitches, K2tog, P1, K1 K2tog two times, K1, P1 (18 stitches)
Next RS Row:
K1, P1, SSK twice *K1, P1* repeat to last 8 stitches, K2tog, P1, K1 K2tog, K1, P1 (14 stitches)
Tab for loop & buttonhole:
The length on this can vary to what you want. I like it to have a loop that is big enough to be buttoned over an oven door dowel or a drawer pull. So I made mine large enough to do that. But you can vary it to whatever size works for you.
Here is what I did for mine:
Repeat seed stitch for 3" then create buttonhole.
Button hole -
RS Row:
K1, P1 three times, bind off 2 sts, K1, P1 to end
WS Row:
P1, K1 three times, cast on two stitches, P1, K1 to end
I cast on using the knit on method. It is a little more rigid than some other cast on methods which I find useful for the button hole. I like them to stretch some but not too much.
Continue in seed stitch for 3/4".
RS Row:
SSK, *K1, P1* to last 2 sts, K2tog (12 sts)
WS Row:
K1, P1 across row
RS Row:
SSK, *P1, K1* to last 2 sts, K2tog (10 sts)
WS Row:
P1, K1 across row
Bind off stitches.
There can be a lot of variation with this. That is the beauty.
Other notes:
I find it very useful to place markers every 10 stitches when doing the chart. It makes it much easier to easily find your place in the pattern.
I used brown for the tree stem because I had some. It is easy enough to remove it from the chart or just do it in green.
I like the seed stitch for the tree. I find it gives a nice texture that echoes an evergreen. However, if you find it simpler, I am sure the tree would look good in stockinette as well.
I also thought about adding some embroidered ornaments or such. But I decided not to given the recipient. However, you could make it more fancy if you like.
The one confess I have to make is about the chart. I goofed when charting it. I selected the cross stitch grid, not the knitting one. Oops. So the tree is more squat than I intended. But it is still nice. I think when I do the pattern to post here, I will redo the chart as well. Though that might mean I never get around to posting it. So I might change my mind. *laugh*
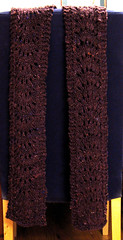
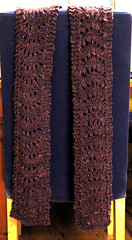
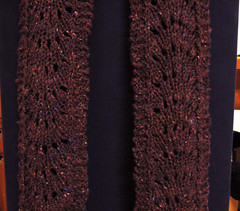
Scallop Scarf in Three Bags Full Handspun
Cast On:
November 22 2008
Completed:
November 25 2008
Pattern:
Scallop Scarf by Wendy Johnson
from Wendy Knits: My Never-Ending Adventures in Yarn
http://www.amazon.com/Wendy-Knits-Never-Ending-Adventures-Yarn/dp/0452287324/
(Picked up book on free shelf at work)
Made for:
Me Probably
Size:
62" x 6" (could have been 85" x 5" but reblocked to make shorter)
Needles:
US 13 / 9.0 mm Knitpicks Options
Yarn:
My Handspun made with Three Bags Full Silk and Wool Roving in the Midnight Magic
0.88 skeins = 154.0 yards (140.8m)
Purchased at Rhinebeck 2008 (think from Carolina Homespun but not 100% certain)
http://carolinahomespun.com/Merchant2/merchant.mvc?Screen=CTGY&Store_Code=CH&Category_Code=3BF-ROV
Super simple pattern. Easy to memorize. And given the bulky yarn, it was very quick to knit.
I debated a lot what I wanted to do with this yarn. I really love how soft and squishy it is. It feels lovely with the silk and has a subtle sheen to it.
I wanted something that would highlight the yarn. But I couldn't do anything too complex because the yarn isn't very even. Also, I didn't think given the woolen spin on the yarn that anything with a lot of stitch definition would work well.
I decided this was simple yet pretty. I think it will come out well. I just hope it doesn't roll too much. But I think the garter edge will help it to stay flat.
I think it looks good. I was concern that there is enough to make a decent length scarf. I actually have about 1/2 an oz left.
I had to redo the blocking. The first time it was too long (85"). I didn't want that much length as this is a decorative scarf. So I reblocked it. It is now 62" which is a much better length for a decorative scarf. Though it doesn't show the pattern as much, it looks good.
Two for now. I will post more later I hope.
No comments:
Post a Comment