Showing posts with label Dishcloth. Show all posts

Monday, December 15, 2008

I finally have a chance to take a breath at work. Not saying there isn't still tons to do, but I am getting help on the major project. Also, they are giving us the week after New Years to work on it. So I am not as frantic. Hooray!

So I am catching up on pics of FOs and WIPs. Whee.


I will probably do these a couple at a time from oldest to newest so I post these as I get a chance today. I am hoping to get all caught up today. But that may not happen as I have work that needs to get done. So here goes!


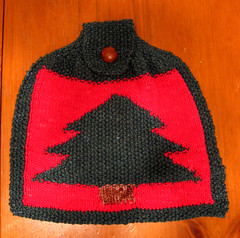
Christmas Tree Dish Towel


Generated by Flickr Album Maker

Cast On:

November 25 2008


Completed:

November 29 2008


Made for:

Big George


Needles:

US 7 / 4.5 mm


Yarn:

Lily Elite Cotton

Purchased at Smiley's Yarns sale in NJ


Size:

Prewash - 12" x 12" (including flap)


The tree chart was created with KnitPro by microrevolt.org:

http://www.microrevolt.org/knitPro/


I was going to use the towel top from the Christmas Lace Kitchen Hanging Hand Towel.

http://wishingiwasknitting.blogspot.com/2008/04/christmas-lace-kitchen-hanging-hand.html


However, I tried that top and ripped it out. That top cuts in very sharply which was obscured the pattern on the towel. Because of the way it pulls in, it was making the top of the tree disappear in the folds.


So I improvised the decreases on the top to not obscure with the design on the towel portion. It is some basic decreases taking into account the seed stitch pattern I had been using. I think it worked out fairly well.

I am planning on posting the finished pattern on my blog when I get the time.


Basic pattern:

Cast on 58 sts.

4 rows of seed stitch in green

At each edge, do 4 sts in seed stitch.


RS Row:

K1, P1 2x


WS Row:

P1, K1 2x


For the center of the towel, follow the chart.


Note:

If you want less bobbins floating around, you can either eliminate the seed stitch edge or do it in the background color.


6 rows of seed stitch in green


Now, start decrease for the top of the towel.


RS Row:

K1, P1, SSK twice *K1, P1* repeat to last 8 stitches, K2tog, P1, K1 K2tog, K1, P1 (54 stitches)

All WS Rows:

P1, K1 across

Next RS Row:

K1, P1, SSK four times *K1, P1* repeat to last 16 stitches, K2tog, P1, K1 K2tog three times, K1, P1 (46 stitches)

Next RS Row:

K1, P1, SSK four times *K1, P1* repeat to last 16 stitches, K2tog, P1, K1 K2tog three times, K1, P1 (38 stitches)

Next RS Row:

K1, P1, SSK three times *K1, P1* repeat to last 12 stitches, K2tog, P1, K1 K2tog two times, K1, P1 (24 stitches)

Next RS Row:

K1, P1, SSK three times *K1, P1* repeat to last 12 stitches, K2tog, P1, K1 K2tog two times, K1, P1 (18 stitches)

Next RS Row:

K1, P1, SSK twice *K1, P1* repeat to last 8 stitches, K2tog, P1, K1 K2tog, K1, P1 (14 stitches)


Tab for loop & buttonhole:

The length on this can vary to what you want. I like it to have a loop that is big enough to be buttoned over an oven door dowel or a drawer pull. So I made mine large enough to do that. But you can vary it to whatever size works for you.


Here is what I did for mine:

Repeat seed stitch for 3" then create buttonhole.


Button hole -

RS Row:

K1, P1 three times, bind off 2 sts, K1, P1 to end


WS Row:

P1, K1 three times, cast on two stitches, P1, K1 to end


I cast on using the knit on method. It is a little more rigid than some other cast on methods which I find useful for the button hole. I like them to stretch some but not too much.


Continue in seed stitch for 3/4".


RS Row:

SSK, *K1, P1* to last 2 sts, K2tog (12 sts)

WS Row:

K1, P1 across row

RS Row:

SSK, *P1, K1* to last 2 sts, K2tog (10 sts)

WS Row:

P1, K1 across row


Bind off stitches.


There can be a lot of variation with this. That is the beauty.


Other notes:

I find it very useful to place markers every 10 stitches when doing the chart. It makes it much easier to easily find your place in the pattern.


I used brown for the tree stem because I had some. It is easy enough to remove it from the chart or just do it in green.


I like the seed stitch for the tree. I find it gives a nice texture that echoes an evergreen. However, if you find it simpler, I am sure the tree would look good in stockinette as well.


I also thought about adding some embroidered ornaments or such. But I decided not to given the recipient. However, you could make it more fancy if you like.


The one confess I have to make is about the chart. I goofed when charting it. I selected the cross stitch grid, not the knitting one. Oops. So the tree is more squat than I intended. But it is still nice. I think when I do the pattern to post here, I will redo the chart as well. Though that might mean I never get around to posting it. So I might change my mind. *laugh*


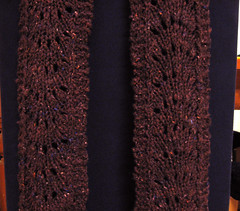
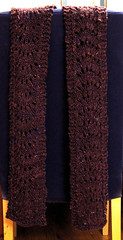
Scallop Scarf in Three Bags Full Handspun


Generated by Flickr Album Maker

Cast On:

November 22 2008


Completed:

November 25 2008


Pattern:

Scallop Scarf by Wendy Johnson

from Wendy Knits: My Never-Ending Adventures in Yarn

http://www.amazon.com/Wendy-Knits-Never-Ending-Adventures-Yarn/dp/0452287324/

(Picked up book on free shelf at work)


Made for:

Me Probably


Size:

62" x 6" (could have been 85" x 5" but reblocked to make shorter)


Needles:

US 13 / 9.0 mm Knitpicks Options


Yarn:

My Handspun made with Three Bags Full Silk and Wool Roving in the Midnight Magic

0.88 skeins = 154.0 yards (140.8m)

Purchased at Rhinebeck 2008 (think from Carolina Homespun but not 100% certain)

http://carolinahomespun.com/Merchant2/merchant.mvc?Screen=CTGY&Store_Code=CH&Category_Code=3BF-ROV


Super simple pattern. Easy to memorize. And given the bulky yarn, it was very quick to knit.


I debated a lot what I wanted to do with this yarn. I really love how soft and squishy it is. It feels lovely with the silk and has a subtle sheen to it.


I wanted something that would highlight the yarn. But I couldn't do anything too complex because the yarn isn't very even. Also, I didn't think given the woolen spin on the yarn that anything with a lot of stitch definition would work well.


I decided this was simple yet pretty. I think it will come out well. I just hope it doesn't roll too much. But I think the garter edge will help it to stay flat.


I think it looks good. I was concern that there is enough to make a decent length scarf. I actually have about 1/2 an oz left.


I had to redo the blocking. The first time it was too long (85"). I didn't want that much length as this is a decorative scarf. So I reblocked it. It is now 62" which is a much better length for a decorative scarf. Though it doesn't show the pattern as much, it looks good.


Two for now. I will post more later I hope.


Wednesday, November 26, 2008

Finished & Almost Finished Projects

With my work conference last week, it was good for my knitting. I was able to knit under the table during a lot of the meetings. *grin* The funny thing is I actually pay much better attention while I am knitting than I did before. I only need to listen for a few critical things. So a lot of my time is idle and I don't need to write much. So it was good.

I finished up some projects which always feels good. *smile*

Cabled Cardigan for Littlest George


Generated by Flickr Album Maker

Cast On:

November 15 2008

Finished All but Buttons:

November 23 2008

Pattern:

Seed Stitch Cardigan by Sarah Hoadley

http://cache.lionbrand.com/patterns/70204A.html

Pattern used as a base, but modified a good deal

Made for:

Denny / George III

Size:

3 yrs

Needles:

US 7 / 4.5 mm & US 8 / 5.0 mm Knitpick Options

Yarn:

Bernat Silky Soft

1.4 skeins = 385.0 yards (352.0m) in 135 - Navy

&

0.3 skeins = 82.5 yards (75.4m) in 00387 - Charcoal

Purchased at Smiley's Yarns sale in NJ

I have finished everything but the buttons. I need to buy some for it.

I took the pattern as a starting point but didn’t use the seed stitch pattern on the body. I have modified it a good deal to fit with what I wanted to create.

I did the edging in grey & the body in navy. I chose to do a rib at the cuffs and bottom edge with the size 7 needles. The body was done with the size 8s.

I wanted an even # of stitches on the back so I increased it by 1. I figured that wouldn’t make a difference in terms of size.

I decided on a claw cable with a reverse stockinette background highlight it. The cable is a very simple repeat with only 1 of the 8 rows requiring anything other than knit or purl for all the stitches in the row. Simple was important as I knew I would be knitting a lot of this while at my work conference. So it involved a lot of knitting under the table.

I like it. Though I think I should have gone up a needle size. It is a bit stiffer than I would have liked.

The yarn isn't ideal. It is okay. But I stuck with acrylic as it is easily machine washable. I think it was the smarter move. However, I really wish it was softer.

Scallop Scarf in Three Bags Full Handspun
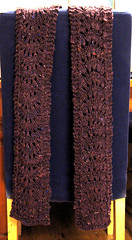
(The pics are the first batch of blocking I did. I need to retake them later.)


Generated by Flickr Album Maker

Cast On:

November 22 2008

Completed:

November 25 2008

Pattern:

Scallop Scarf by Wendy Johnson

from Wendy Knits: My Never-Ending Adventures in Yarn (Picked up book on free shelf at work)

Made for:

Me Probably

Size:

62" x 6" (could have been 85" x 5" but reblocked to make shorter)

Needles:

US 13 / 9.0 mm Knitpicks Options

Yarn:

My Handspun made with Three Bags Full Silk and Wool Roving in the Midnight Magic

0.88 skeins = 154.0 yards (140.8m)

Purchased at Rhinebeck 2008 (think from Carolina Homespun but not 100% certain)


Super simple pattern. Easy to memorize. And given the bulky yarn, it was very quick to knit.

I debated a lot what I wanted to do with this yarn. I really love how soft and squishy it is. It feels lovely with the silk and has a subtle sheen to it.

I wanted something that would highlight the yarn. But I couldn't do anything too complex because the yarn isn't very even. Also, I didn't think given the woolen spin on the yarn that anything with a lot of stitch definition would work well.

I decided this was simple yet pretty. I think it will come out well. I just hope it doesn't roll too much. But I think the garter edge will help it to stay flat.

I think it looks good. I was concern that there is enough to make a decent length scarf. I actually have about 1/2 an oz left.

I had to redo the blocking. The first time it was too long (85"). I didn't want that much length as this is a decorative scarf. So I reblocked it. It is now 62" which is a much better length for a decorative scarf. Though it doesn't show the pattern as much, it looks good.

Slip Stitch Dish Towel

Slip Stitch Dish Towel

Cast On:

November 15 2008

Completed:

November 18 2008

Pattern:

Textured Slip Stitch by Dishcloth Boutique

http://www.groupepp.com/dishbout/kpatterns/texturedss.html

Made for:

Cullen Probably

Needles:

US 7 / 4.5 mm Knitpicks Options

Yarn:

Lily Elite Cotton - Dyed by Me

1.2 skeins = 220.8 yards (201.9m)

Purchased at Smiley's Yarns sale in NJ

Cull likes Xmas stuff so I figured the red & green would work for her. I hope she likes it. I might switch some of the red & green dish towels around if I think there is a better fit. But probably staying with Cull on this one. We will see.

Very simple pattern. Was even able to do it at conference, under the table. *grin*

17" x 8" before washing & drying. Suspect it will shrink some with machine drying.

Wednesday, November 5, 2008

Dyed Yarn & Xmas Knitting

Here are some pics of the Lily Elite Cotton yarn I dyed over the weekend.


Generated by Flickr Album Maker

Some are much lighter after they dried than I anticipated. But I am pretty happy overall with the colors. Other than the red. It is a bit too light for my tastes. Problem was I ran low on the Fire Red dye that I was using. I added some fuscia red dye to it. But it still seems to pale. But it is bright enough that I think it will be good as a Christmas red. *crosses fingers*

I dyed it with the intention of creating dish cloths/towels for some people as Xmas presents. I hope that will be enough. I confess I am feeling tapped out money wise. So that may be all some people get. Though I am betting other people are in a similar situation this year. So I am not going to stress it.

(I can post this on here because non-knitters I know do not read this. And if you are a knitter who will be getting a present from me, you should know this won't be your present! *grin*)

I started with one for my sister-in-law. Only to rip the entire thing out and pick another pattern.

The first pattern I picked was:

http://www.jimsyldesign.com/dishbout/kpatterns/smocked.html

Pretty, but I realized the carried over strands that are picked up are a terrible idea for a dish towel! It would get caught on anything like utensils and such! Not sure why so many people have made that one on Ravelry. I think it would be fine as a washcloth, but not a dishcloth in my opinion.

I end up doing this one instead:

http://www.jimsyldesign.com/dishbout/kpatterns/ostplume.html

It is simpler than it looks but pretty. I think my sister-in-law will like it. *crosses fingers*

Ostrich Plume Dish Towel Xmas Present

Ostrich Plume Dish Towel Xmas Present

Cast On:

November 4 2008

Pattern:

Ostrich Plume Dishcloth by Edith Taylor

http://www.jimsyldesign.com/dishbout/kpatterns/ostplume.html

Made for:

Sister-in-law J

Needles:

US 7 / 4.5 mm Knitpicks Options

Yarn:

Lily Elite Cotton - Dyed by Me

1 skeins = 184.0 yards (168.2m)

Purchased at Smiley's Yarns in Woodhaven, New York

The purple, brown & mixed grey and other colors are for some of my other in-laws. The brown & grey were to compliment their kitchen colors. (Though I am not sure about the grey one. I will knit it up, but it may end up getting redyed or some The purple is just because I know my sister-in-law likes purple. I am figuring the red & green for some Xmas towels.

I still have 4 balls of the Lily Elite Cotton that isn't dyed. I am debating what I will do. One of my sister-in-laws like cows. So I was thinking about doing something about that for one of them. But I didn't dye that up. I was originally thinking about knitting it first and then dyeing it. But now I am thinking it would make more sense to dye it first.

I will see if I have any left over brown from the one. Also, there is a Smiley sale the first week of December. So I can check if they have more of the cotton in other colors.

I used up all my black dye, the fire red and some others during the dyeing over the weekend. So I either need to replenish it or just go with what I have for the time being. I have plenty of knitting ahead of me. So we will see. *smile*

Also, here is a pic of the Panda Cotton sock blank I dyed over the weekend.

Whimsy Pimsy Panda Cotton Sock Blank - Dyed by Me

Sock Blank Purchased from Whimsy Pimsy etsy shop:

http://WhimsyPimsy.etsy.com

I am honestly not sure about the colors. They aren't what I was expecting. But I think it will be interesting.

I am leaning towards doing something like a chevron to get movement to the stripes. But I also do not want anything too complex given this will be my first time knitting with a sock black.

The Sock Knitters Anonymous KAL for Nov. is either a Wendy Johnson pattern or mosaic knitting. I am very tempted by mosaic knitting but do not have yarn for it. I was thinking about using one of the Wendy Johnson toe up patterns and adding a chevron to it. I am a bit tempted by her toe-up feather and fan pattern. But I suspect that would be too busy for the yarn.